If the Box Fits: Camera Obscura

This idea came from the Best of Beakman’s World videos. Our son started watching them because I told him he wasn’t going to be sitting in front of the TV all summer.

He negotiated: Even if it’s educational? What about Beakman’s World? And Liberty’s Kids?

My counter: Okay, you can watch Beakman’s World, but you have to do some of the experiments, too.

Son: And then I can watch Top Gear and Mythbusters.

Sigh.


CamObsc1

1. Cut a hole big enough for your head to go through a large box, slightly forward of center.*

2. Tape a piece of white paper on the panel furthest from your head-hole, on the inside of the box. See it (above photo) back there?

CamObsc2

3. Tape up ALL the seams with a light-blocking tape like masking tape, or the ever useful Duct Tape.

CamObsc3

3. Wrap a towel around your child’s neck, and place the box over his head. Check for stray light; if he sees any, repair it.

4. After removing the box from your child’s  head (muy importante, ¿no?), use a nail to poke a small hole in the panel opposite from the white-papered side.  Poke the hole higher up than the level of your head.

CamObsc4

5. Re-wrap the towel, replace the box over head (so that the boxed-person is facing the white paper) and observe the upside down images of whatever might be taking place behind you.


CamObsc5

We personally enjoyed the outdoor images best. The above photo was collected by placing our camera INSIDE of the box and remotely snapping the picture. (It’s a photo of tree branches and leaves).


*Not a typo. Make it big enough for YOUR head. You’ll want to check it out.


How does it work (simplified)?

We see things when light bounces off of them. The light bounces off in every direction.

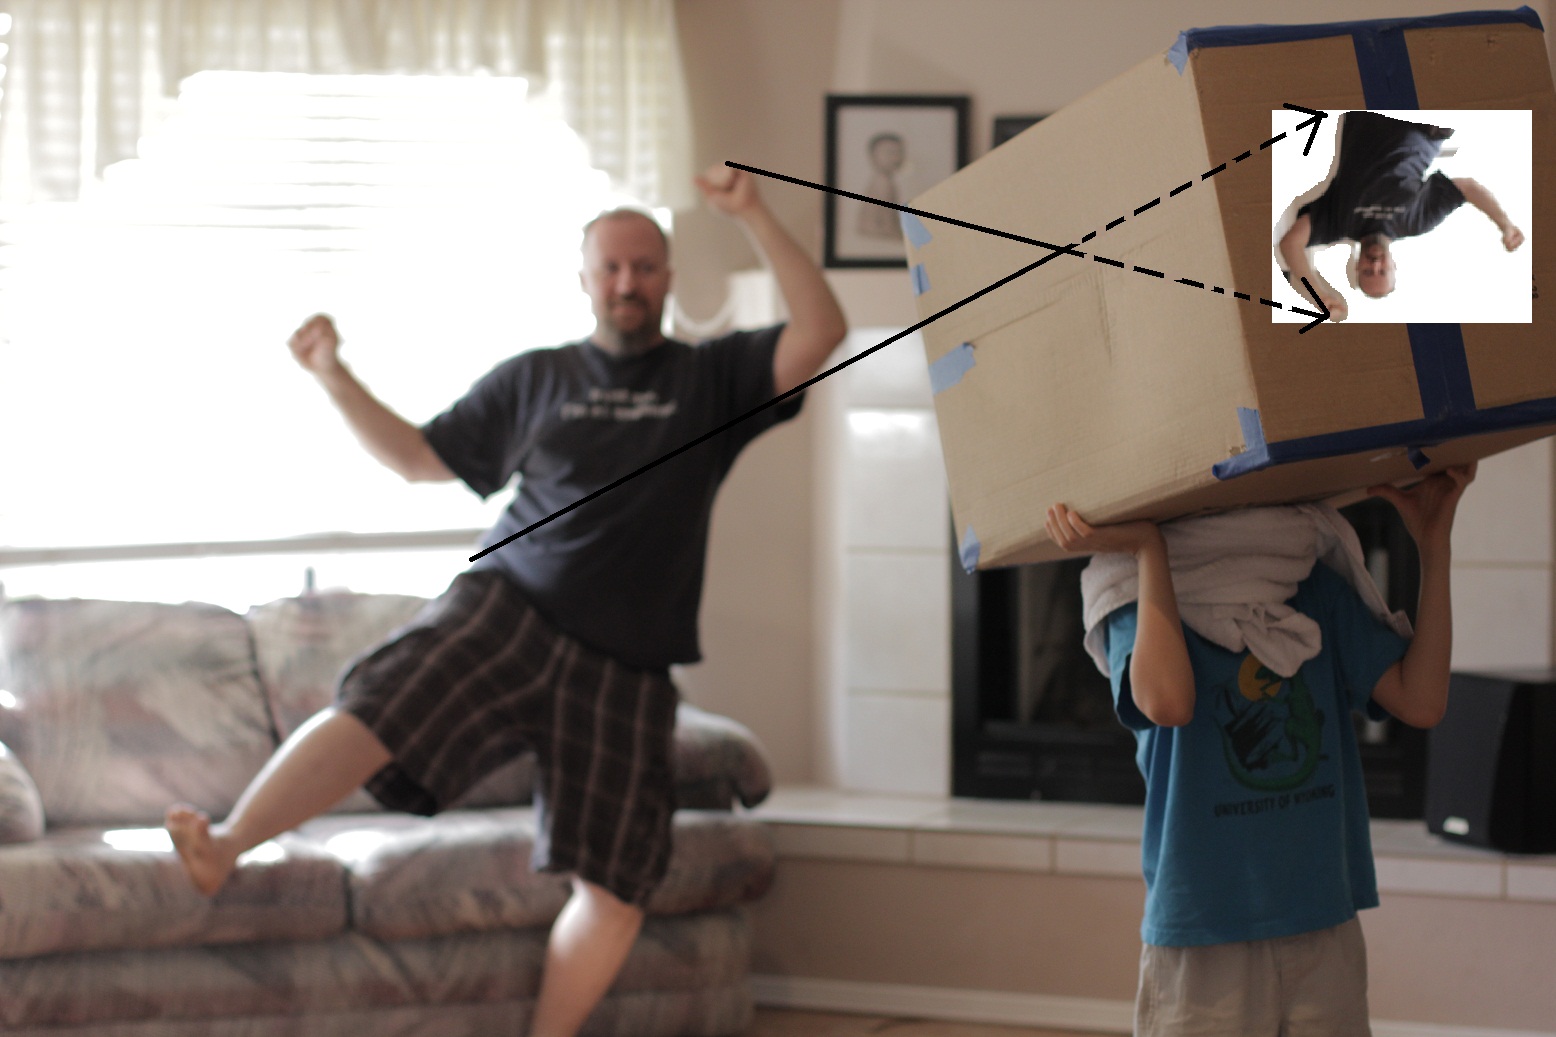
When the light bounces off of Dancing Dad, a tiny bit gets through the nail hole in the cardboard box, and we see that reflected light as a reversed (and pretty dim) image on the white paper taped inside of the box:


This is exactly how a pinhole camera works, and I urge you to check this site out if you’d love a great summer project:

http://users.rcn.com/stewoody/


Take it to a whole new level, and turn your whole bedroom into a camera obscura – just block all the light coming into your room except for a small hole from the window, wait for your eyes to adjust, and watch the opposite wall/ceiling to see what’s going on outside:  from http://commonsensephotography.com/camera_history_and_a_light_concept/index.php

Categories: Science | Tags: , , , , , , , | 5 Comments

Whatever floats your boat!

Alternatively entitled, “1001 Uses for Old Taekwondo Boards, Use #1”

Our son, like every other child in his Taekwondo class (so I hear), has an under-bed full of these boards. The sheer joy derived from breaking them evidently grants the boards immunity from ever being discarded. This leaves us with a lot of boards which, incidentally, float.

Materials for Propeller Raft:

  • Lightweight wood, such as balsa wood, or if you happen to be so lucky, board-breaking boards from Martial Arts class.
  • Straightedge, such as a ruler. We used the edge of an envelope. ‘Cuz we’re flexible like that.
  • Propeller – ours came from the Party store, and is the type you’d find for 5/$1.00 at the dollar store.
  • Rubber bands
  • Glue
  • Screw Eye/ Eye bolt
  • Pocket knife, exacto knife… something sharp but non-lethal.
  • Straw

Cutting a groove for the propeller in both sides of the wood (we used the straight edge to make, well, a straight edge for the groove):

IMG_0477

After Experiment #1 (aka Friction, or, Will the propeller shaft move more smoothly inside the wooden groove, or inside a straw? Straw, totally.), gluing a straw into the wooden groove:

IMG_0497

Missing steps include (and not necessarily in this order):

  • Insert a screw eye into the end of one of the wood bits. If you look closely, you can see the screw eye underneath the straw in the above picture.
  • Loop a rubber band through the screw eye.
  • Glue, and when the glue completely fails to hold, rubber band the two bits of wood together such that the straw cannot come loose.
  • Insert propeller shaft into straw


Here, Andrew puts the rubber band around the propeller blade:

IMG_0504

Twists, and then lets go:

IMG_0516

And to the tub, where we try for experiment #2 (or, Which will go faster, the raft with a truck, or without a truck?), and find out that Murphy’s Law ALWAYS applies to experiments (it was very difficult for Boo to wind the propeller and balance the truck at the same time). Lucky kid, I didn’t learn that lesson till grad school.

IMG_0555

Categories: Crafts, Kids, Science | Tags: , , , , , , , | 2 Comments

Peep Nests and Peep Science


rice crispy nests

Peep Nests

This use of Peeps is not so exciting nor so entertaining as the Dueling Peep Microwave Battle, but it’s probably more socially acceptable .


Tips:

  • You can’t possibly use too much butter. Butter your hands, spoons, everything (EVERYTHING). This is going to be messy.
  • While it’s important to work quickly, you can let the Treats cool to a warm but comfortable temperature before working with them. Then be fast.
  • The Kellogg’s Rice Crispy recipe seems to work really well for this. It calls for a higher Crispy-to-Mallow ratio than does the Marshmallow-Bag recipe  and that seems to work really well for shape retention.


DO save a few extra Peeps and DO have a Peep Battle. One of my son’s classmates came over and they had a (supervised) blast.  Unless you like cleaning plates with melted marshmallows cemented to them, I highly recommend staging the battle on graham cracker halves, and placing the Peeps on a bed of Peep Poop* before the battle begins. Upon removal from the microwave, top with another graham cracker half and enjoy.

__________________________

Science Lesson Of the Week

(How to Transform Peep Dueling into a Socially Acceptable Pastime)

When a marshmallow is heated (in the “heat of battle” as it were), it’s not the sugar that’s visibly expanding. It’s the air that has been whipped into the candy.

  1. Air is made up of gas molecules.
  2. The molecules are heated (with the microwave).
  3. Heat is a form of energy.

    Heated Air, from http://www.britannica.com

    Image courtesy of britannica.com

  4. If you give a child more energy (like sugar, which is stored energy), said child will bounce off the walls and make the most of his enclosure. Er, space.
  5. If you give gas molecules (such as the air that’s been whipped into a Peep) more energy, they will do the same thing a child will:  bounce off the “walls” and make the most of their (in the case of the Peeps, stretchy) enclosure.

Follow  up question:  The air-filled spaces inside of a peep are stretchy and sealed. What would happen if you heat up air inside of a sealed, rigid container? **

Duel the Peeps. After all, it’s for science.


*Chocolate chips, for those of you who don’t have 8 year old boys in the house.


** Answer: Pressure will build up. If the pressure exceeds the strength of the container, the container will burst. Boom.

Categories: Cooking, Kids, Science | Tags: , , , , , , , | Leave a comment

The year Dad ran over the Rabbit.

Dad is a truck driver. A long-haul driver for most of my childhood, he was often unable to make it home on the day everyone else celebrated a holiday.

We therefore became accustomed, over the years, to writing letters to Santa and the Easter Bunny:


I'm surprised I even bothered to sign the other children's names.

Even little kids understand the power of, well, let’s just call them incentives.

Did I mention my dad drives a BIG truck? It’s important to keep this in mind.

If you’ve been around children on the night before a holiday, you know that there is a special sort of magic in the air. This particular Easter took place a week late, in 1982.*  Picture, if you will, four sweet little children (“Sweet” as in, “Bless their sweet little hearts”**) ranging in age from 2-6 years old.  We’ve just finished dyeing the table, each other, and by a remarkable feat of effort on the part of our parents, most of the eggs.  Conversation has naturally turned to cataloguing potential hiding places…

  • Barbecuer? Yes.
  • Truck bumper? That’s a given.
  • Wheel well on the Blazer? It could go either way.
  • And every child in our family for three generations knows that the Bunny has a weirdly obsessive compulsion to stick an egg in the end of the clothesline T-post. It’s in his genetic makeup and has to do with the relationship between rabbits and holes***. I’m a scientist so you can believe me in this.

It's the law.

…when dad looks up from removing his last egg and says,

“Oh, I don’t think you’ll have to look for eggs tomorrow. I’m pretty sure I ran over the Easter Bunny on Sunday.  About yay high, wears a bow-tie?”

He looks from child to stricken child.

“Yeah, I’m pretty sure it was him.”

And this, folks, is how you create those special family memories that last a lifetime.

Stay tuned to a future post to find out how you can traumatize your child at Christmas with just a chimney and an old Don Knotts/Tim Conway movie. Wookalars may be involved, but I don’t want to spoil the surprise.


*Which I believe is the year before classmate Rachel told me the truth about the Rabbit and the Big Guy in the Red Suit. It was a conversation I purposefully and successfully managed to repress for several more years, having come to the realization that, as the oldest child, holidays would be much less magical when my parents found out they had a “Little Helper”. Finding the hidden Easter eggs is much more efficient but decidedly less exciting when you’re the one who hid them.

** This was mainly true of those who knew us, and of our propensity to do things like break into the house paint of a morning, and color coordinate ourselves and the deep freeze with our home’s exterior. Or to dig out the Christmas lights and joyfully stomp on them one at a time. Pop! Pop! Pop!  It’s like stomping on mud cracks but with that extra little thrill that comes with the growing certainty that you are in imminent danger. No, not from broken glass. From Mom.

*** You may have thought I would say something else here. Shame on you.


Categories: Growing up Boonie | Tags: , | 1 Comment

Care Packages and Reverse Care Packages

An Easter Care Package for my cousin in the Navy

Deployed service members have limited access to a lot of the little things we take for granted, and care packages from friends and loved ones back home really mean a lot.

  1. How to ship? The US Postal Service offers a reduced FPO/AE rate on their large flat rate box. For $12.95 you can mail up to 70 lbs.
  2. What to ship? Well, don’t send chocolate (it melts). If you make cookies, make sure they’re the sort that can last a week or four in processing and that they are very well packaged. For more suggestions, check out this list.
  3. Who to ship? Haha, just seeing if you were paying attention. You can’t mail yourself – 70 lb weight limit, remember?

With social media becoming so popular, we are much more likely to know when our cousin, old high school buddy, or friend’s husband, ships out, than we were even 5 years ago. Get an address before they ship out, and make a note on your calendar to send something out at the “halfway point” or a major holiday.

More ideas:

  • For fun, try sticking to a theme.
  • Unofficially, you (or the kids) can decorate the flat rate boxes as long as you leave the shipping information area clear.
  • Sending off a  Reverse Care Package for the spouse and/or children of a deployed service member is a very special sort of kindness.


Categories: Community | Tags: , , , , , , , | 1 Comment

Little Helpers

Bug helps make Daddy's birthday breakfast.I think kids should help out in the kitchen as frequently as possible.

In order to convince you that this is true and good, I’m sharing a picture of Bug.


Yes, she’s covered in flour.

Yes, she has squished blueberries in her toes.

Yes, I had to watch her so closely that the recipe (Dutch Pancakes, in this instance) took about twice as long.

But look at that face. That is a face of pure contentment, and it’s a photo-op you can’t get in any studio.


My tips and observations regarding young toddlers and kitchens:

  • Your toddler will need his very own bowl and spoon. Bonus points if you have an extra “neat” utensil to share, like a whisk, or a small rolling pin.
  • Hold them up to the sink and let them wash the ingredients. Even if you have to re-wash after they leave the room.
  • For a very young child, a spoonful of flour is enough to “mix”. A sprinkle of cinnamon makes the mix smell nice.
  • My friend’s 2-year-old enjoys mixing a 1/4 cup of dry rice around the bowl while we mix our bread dough. After we have dough, of course, we give her a bit to knead.
  • Give an older toddler a little of each ingredient you are mixing. If the ratios are reasonably close, you can even bake/cook a mini version (as a pancake on the griddle, for example, or if you’ve given him a bit of bread dough to knead, bake a mini loaf).
  • If your toddler has the stirring thing down, get her involved with the “real” food. Let her mix the cake batter or pancake batter. Let him beat the eggs.
  • Take a picture. Take lots of pictures.
  • Never leave your child unattended, not even for a moment.


While you’re cooking together, be sure to sprinkle your conversation with such tidbits as “Oh boy, I can’t wait to do the dishes! That’s the best part!”

You never know. It might work.

Categories: Cooking | 8 Comments

Going Green (For St. Patrick’s Day)

GreenBread

Leprechauns invaded our home during the wee hours of the morning. They broke into my pantry, swiped my potatoes, and hid them throughout the house.

The milk was green.

My fresh-baked loaf of bread was green. Try eating a tuna salad sandwich on green bread. I dare you.

Does anyone know of an earth-friendly, “green” leprechaun repellent?

Categories: Cooking, Crafts, Kids | Leave a comment

Two-for-One Space Shuttle: Valentine Box and Monster Truck Piñata

CRASH LANDING!

Our nation’s farewell to the beloved space shuttle has been at the front of our minds this past few months, so it’s no wonder that when I asked our 2nd grader what type of Valentine’s Day box he wanted to decorate (thinking of the oatmeal-can rocket ship, or the ubiquitous construction paper-wrapped shoe box) he insisted on a space shuttle.  Mom and Dad built it, and Boo (our son) decorated it. After completing its noble card- and goody-carrying mission, it was decommissioned to the top of our son’s dresser. I despaired of ever getting rid of it.

Fast forward a month to Boo’s (belated) birthday party. After looking around town, unsuccessfully, for a suitable piñata for a mature young man of 8 years, we decided to build our own.  Boo wanted a monster truck, and as we tried to negotiate features (he wanted fancy rounded edges, I wanted a simple boxy design) we remembered the Valentine Shuttle. It even had a handy dandy candy compartment in the form of a cargo bay.  Why not turn it into a custom Monster Truck? So we did.


Part One: Valentine Box

We used NASA Diagrams for  the cool background information (did you know the orbiter is just a very elaborate glider, when all is said and done?) and for the shuttle’s general shape:

pinata1a

Fairly simple construction – a corrugated cardboard box, with paper board sides and a cone for a nose. For the Valentine Box, we used packing tape and painted with tempura and acrylic paints.

Another view of the original Valentine Box, as Boo prepares to paint:pinata1


After Boo’s first coat of paint.  Acrylic (white paint) worked well on cardboard and but just “okay” over packing tape: Pinata2

Boo did (nearly) all of the painting and sticker positioning. We forgot to take a “completed” picture, so here is a picture taken after the school party, and the following mile-long walk home in the bottom of Bug’s stroller (fortunately, you can’t see the footprint where I trod on it after it escaped containment):

pinata3


Part Two: Monster Truck Piñata

The first thing we had to do was take the entire thing apart and replace packing tape (stronger) with masking tape (weaker), and introduce some points of weakness into the body (we want the piñata to break, eventually). We filled the cargo bay with candy, and shut the payload doors. Using spray adhesive, we wrapped the shuttle in several layers of tissue paper:

pinata4

Missing steps, many missing steps. Well, you can see that we had to wrap and replace all of the shuttle bits, but we also added:

  • A trapezoid-shaped box with straws glued to it, for the monster truck’s suspension
  • Wheels (we glued on crumpled tissue paper bits, à la preschool craft hour)
  • Pom-poms for flame-exhaust.

Our son supervised the decorations and named the monster truck Crash Landing. (Yeah!)  Finally, we did something we should have done at the beginning (woops) and added the hangers – zip ties – so that we’d be able to hang the piñata. Ta-da!

pinata5

And here is one very excited little guest:

Photo Credit: Tara Bobadilla

Categories: Crafts, Kids, Science | Tags: , , , , , , | 2 Comments

Fingerpainting with Pudding – Fun for the Bigs and the Littles


It’s been harder to find activities that are fun for both of the kids – the one-year-old as well as the eight-year-old – but this fingerpainting activity kept them both busy for nearly an hour (and not just the kids – Jason had a blast playing with his new camera lens).

Finger painting with vanilla pudding is nothing new, terribly exciting, or science-related, but I liked how the pictures turned out and it’s been a while since I’ve written anything new here. I guess in that sense, it kept me busy for awhile, too. Score.

________

Step one: Thing One mixes instant vanilla pudding according to directions.*

Step two: Separate the pudding into a few individual bowls.

FingerPaint1

Step three: Add food coloring (Thing One used about 3 drops per 1/4 cup of pudding, and nobody came out permanently dyed as a result of this ratio**).

FingerPaint2

Step four: Paint.

FingerPaint3

Step five: Laugh.

FingerPaint4.

Step six: Wear.

FingerPaint5

Step seven: Love. And a hot bath.


Some background – our son (the eight-year-old) has been complaining about my cooking of late. As a result, I’ve suffered a Mr. Hyde– like transformation into my mother, and parroted (quite without engaging my brain first) that if he didn’t like what I was cooking, he could jolly well cook dinner himself.  This backfired, because my son doesn’t actually know how to cook dinner yet, and the prospect of his favorite meals every night excited him so much that he started complaining even more.  Long story short, we’re teaching him how to cook.

**It’s important that the dye not be too concentrated, or you may end up spending the next few days with Zombie-colored children.  This is a good lesson in color mixing.

Categories: Crafts, Kids | 5 Comments

Water: Fun for the Bigs

We have 48 hours of stuck-at-home time as the Big Winter Storm blows through the area.  “Big” is relative, as we’re only 50 miles from the US/Mexico border, but there you are. This is Part Two (see Part One).

Oh Groundhog Day Tree, Oh Groundhog Day Tree…

DWIce3

We borrowed the Ice Bauble idea from the Babyccino Kids site.

It’s entirely possible that I find this project so exciting for the simple reason that it hasn’t been cold enough to do this project until yesterday. It probably won’t get this cold again for another 6 years. Maybe longer, because I think we’ve hit some sort of record low in the borderlands.  I won’t apologize to those of you who deal with real winters – try making a snowman out of 1/4″ snow accumulation before you judge.

Materials:

  • Food coloring
  • Water
  • Mini muffin cups, tins, plastic or flexible containers*
  • String/yarn
  • Decorations (leaves, rocks)

*I would avoid glass containers, since you may need to dip the container in warm water to release your Ice Bauble.  If you dip frozen glass, you may end up with Insta-Thermal Shock Lesson.

Procedure:

  1. We premixed colors in plastic cups because we can’t get to the fallen leaves. You can use plain water, though, especially if you want to use leaves or rocks.
  2. Partially fill muffin cups and set outside to freeze
  3. Place a looped string on the now frozen bobble, and finish filling with a second color. Set outside to freeze.
  4. Decorate tree, fence, or other immobile object of your choice.

20110202_273

My son’s favorite lesson? Mixing all three primary colors results in the color “root beer” .

You can also use this time to talk about energy loss/transfer, and phase changes. Since this topic ends up on all the elementary school science-standards exams, this isn’t such a bad idea, really.

If you make Ice Baubles with your kids, take a picture and share!

Categories: Crafts, Kids, Science | 4 Comments